
Glassware is something we all collect unconsciously; a birthday arrangement here, a Mother’s Day gift there, a beautiful vase you couldn’t pass on for the price… We keep putting them away until all of a sudden your realtor tells you: “you have to clear up clutter” Clutter? What clutter?! Sure enough, by the time I’d gathered up all glassware in the house I unmistakably had about 15 to 20 pieces! All different shapes and sizes, hidden in the closets or in the cabinets. I realized then I had two choices: get rid of them or, give what I had a makeover. One of the main things you notice when looking at model houses, is the variety of decorative items neatly placed all over the house. I decided I would keep what I had, change it up a bit and save the money for more important things when we move. There’s tons of tutorials in Pinterest on Glass DIY, but beware, not all of them have “store bought glass” end results. I’ll share with you some Glass DIY techniques and tutorials I’ve tried.
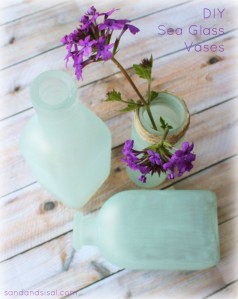
- Sea Glass
Out of all the glass painting techniques I’ve tried, this is by far my favorite. Buying a Sea Glass vase ranges anything from $30 to even $300! Doing it yourself costs only $3.79 (provided you already have a glass piece) and takes you about 1 hour of active craft time! It’s virtually easy and if you follow the tutorial I found on Pinterest, there is no way you can mess it up! There’s one thing I suggest you do different from the tutorial, start painting your piece horizontally, and then once its dry to the touch, paint the second coat vertically. This technique only looks good on clear none tinted glass, if your glass has a slight greenish or bluish tint, don’t be quick to think it will make your job easier, funny enough your end result will actually look cloudy, as if your glass was dirty. Since there’s plenty of Frost Translucent colors to choose from, you can even make pink sea glass! In the end, the possibilities are endless! It’s very important to keep in mind that this method needs to be cured, meaning; it takes 21 days for it to be completely dry and permanent. It might feel dry to the touch, but if you are not careful you could damage the paint (that is before the 21 days). If you are just going to display your piece, just make sure you don’t clean it before the 21 day mark. I used both the Sea Lavender and the Beach Glass color, but I got a unique result by using a coat of one and then using the other color for the second coat.

byLisandra
tutorial
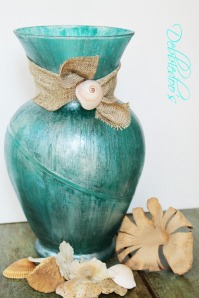
- Mod Podge & Rit Dye
Now when I saw this tutorial, I was very impressed with Debbie’s results. I had to do this! It looks beautiful and expensive. After trying it, I have to say this is my least favorite method. It’s a great technique for weddings and parties when you are looking to impress on a budget. I wouldn’t discard it completely, it’s a neat trick with impressive results. You see, the tutorial doesn’t’ mention that is not permanent. Even if you spray it with Satin Polyurethane (a sealer), you can peal the glue and the dye off the glass. It might have been common knowledge to the avid Mod Podge user; but believe it or not, I don’t use it that often, and it was a surprise to me that after all that work, it’s just a “plastic film” covering the vase. Another thing to keep in mind is that this technique works best on clear or white glass, anything else will show through the dye.

byLisandra
tutorial
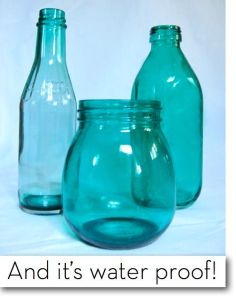
- Staining Glass
Stained glass can cost a pretty penny, specially if you are looking for turquoise or other bright colored glass. This method is pretty simple (once you get the hang of it) and in comparison to buying a $50 vase, it’s a great way to add a modern touch to your current glassware. The actual paint: Pebeo Vitrail Paint, will probably cost you about $10; it’s small, but a little goes a long way so you can do several pieces, plus it’s permanent! This tutorial is pretty simple and straight forward. If you are using pure acetone as your thinner, my best advice is to work quickly, not slowly. Acetone dries fast and you won’t like the results if your paint starts drying while you are still working on your piece. If you don’t like the results, you can remove the paint by placing your glass in hot water, this is time consuming and requires some good scrubbing. I tried both the Translucent Turquoise and the Opaque Ocean Blue. My intention was to have a more lighter turquoise but I was happy with the results I got. Remember, a little paint goes a long way, thin the paint in a separate container and when you are happy with the color poor into your glass. You can find this paint in most craft stores or online.

byLisandra
tutorial
So there it is! Part of my new “Coastal Collection”! I’ll show you what I’ve done with the rest of the glassware another time. Our next post is in the spirit of the Autumn Season! Have a great week!


I think your vase turned out beautiful. I did go in and modify that these are for decorative purposes only. You can use flowers inside and such. I have to say though I have had No peeling or chipping on any of my glass work. I really love what you did though.
LikeLiked by 1 person
Thank you! I actually did two vases and on the second one I was able to just peal off the entire thing off in like a minute! But this looks beautiful in a room with bright lighting!
LikeLike
Pingback: A Glass Makeover Part 2! | by Lisandra
Pingback: Etching Glass Technique! | by Lisandra
Hello there, You’ve done an incredible job.
I’ll definitely digg it and personally recommend to my friends.
I am confident they will be benefited from
this website.
LikeLike
Thank you! I appreciate that! 😉
LikeLike
Pingback: Good Ideas… Bad Ideas! 2 | by Lisandra